How Do I Cut a Window in a SketchUp 2027 Procedural Wall?
 Made with AI
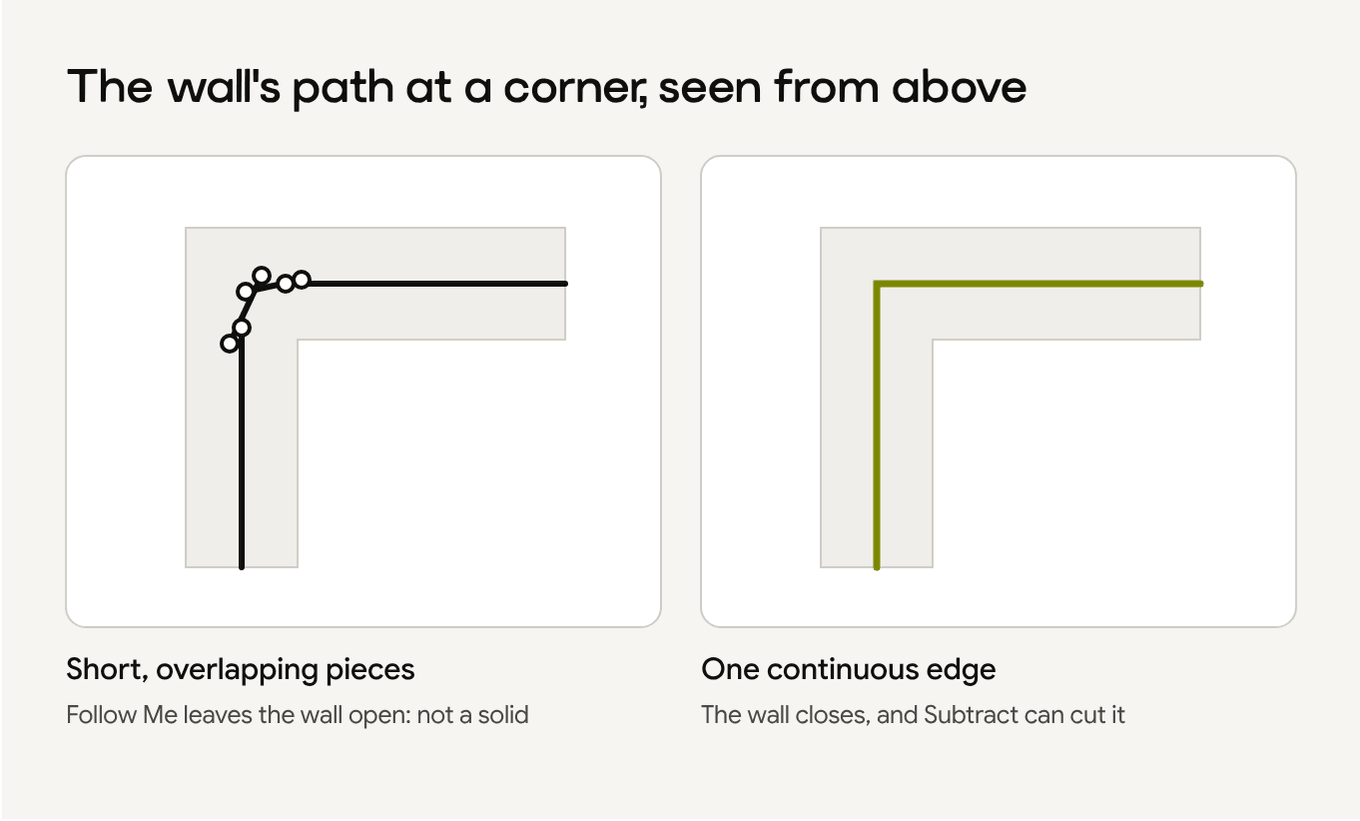
Cut the window with Procedural Subtract, but only after both the wall and the cutting block are solids. If the Procedural Follow Me wall is not a solid, repair the path first: short or overlapping segments at the corners are enough to leave the extrusion open.
Why the wall may not be a solid
A SketchUp forum thread from November 8, 2026 describes this case. A wall extruded with Procedural Follow Me was not a solid, so a window block could not cut a hole. Three corners of the wall also failed to miter.
SketchUp treats a group or component as a solid only when it encloses a finite closed volume. Every face has to be present, and every face has to meet its neighbors at an edge. The Solid Tools help page is where that definition is written, and it is also where you are told to use the Entity Info panel to check whether a selected entity is a solid.
Procedural Follow Me still uses the same path rules as classic Follow Me. The Follow Me help page, last updated November 9, 2026, asks for a continuous set of edges as the path, and for a face as the profile, drawn perpendicular to that path. The profile does not have to touch the path. If you organize the work into groups or components, the path and the profile need to sit in the same group.
In that forum thread, the path at three corners was broken into short segments that overlapped. Once those segments were erased and each corner was replaced with a single edge, the extrusions became solids.
The steps
- Select the Procedural Follow Me component and open the Entity Info panel. That panel reports whether the selection is a solid. If it already is, skip to step 6.
- Open the Styles panel and, under Edge Settings, turn on Endpoints. The Edge Styles help page describes this as a display option: it thickens the ends of edges so you can see where one edge stops and the next begins.
- Edit the procedural component. Double-click it, or use the context menu. Inside, find the path, especially at any corner that did not miter. After you run Procedural Follow Me, you can still edit the path and the profile inside the component. That is the point of a procedural tool, which you open from Procedures in the menu bar or from the Procedural Tools toolbar (View > Toolbars).
- Where a corner is made of several short edges instead of one continuous edge, erase those segments and draw a single new edge in their place. The path should read as one continuous set of edges around the plan. The person who asked in that thread also kept the path slightly above or below the wall profiles, which made the path easier to reach.
- Leave the component and select it again. Check Entity Info once more. If the wall is still not a solid, inspect the profile: it needs to be a closed face, not a set of loose lines, and it should sit perpendicular to the path. SketchUp for Web includes a Solid Inspector tool for finding and fixing gaps. On SketchUp for Desktop, the same class of tool is listed in Extension Warehouse under Solid Inspector.
- When the wall is a solid, model the window as its own solid group or component. The cutting block has to enclose a volume as well, and it has to overlap the wall where the opening should go.
- Open Procedural Subtract from the Procedures menu or the Procedural Tools toolbar. Click the window block first. That first solid is the cutter. Click the wall second. Procedural Subtract keeps the cutter in the model, unlike the older Subtract tool, where the cutting group disappears. If the opening comes out on the wrong body, the Controls section of Entity Info can reverse the subtraction order, and it also lets you choose not to keep the original solids.
When you want plain geometry
A procedural component stays editable. That is useful while you are still moving the window or changing the wall path. When you're done and want ordinary geometry, the SketchUp 2027.0 release notes document a context-menu command, Explode to Inputs, that removes the procedural component and keeps the geometry in the model. Save a copy first, so you keep the editable version.
In the same SketchUp file
Once the wall is a solid and the window is cut, you can keep modeling in that file. If you also need an existing piece of furniture or a room from a site photograph, start from a photo to a SketchUp model. Montea's models are built by AI and checked against your photo. You get an editable SketchUp model at real scale, with named layers. Sizes come from the sizes you give, or from the maker's published dimensions when Montea finds them, otherwise they're estimated from the photo, so check a size before you make anything. Soft parts such as cushions and fabric folds are simplified. The same workflow is useful for interior designers working from site photographs. The FAQ lists what comes back in the file.
Have a photo of the piece you need? Model a Photo